Промышленная зона Вэньян Юэцин Вэньчжоу 325000
Рабочие часы
Понедельник - пятница: 7AM - 7PM
Выходные: 10AM - 5PM
Промышленная зона Вэньян Юэцин Вэньчжоу 325000
Рабочие часы
Понедельник - пятница: 7AM - 7PM
Выходные: 10AM - 5PM

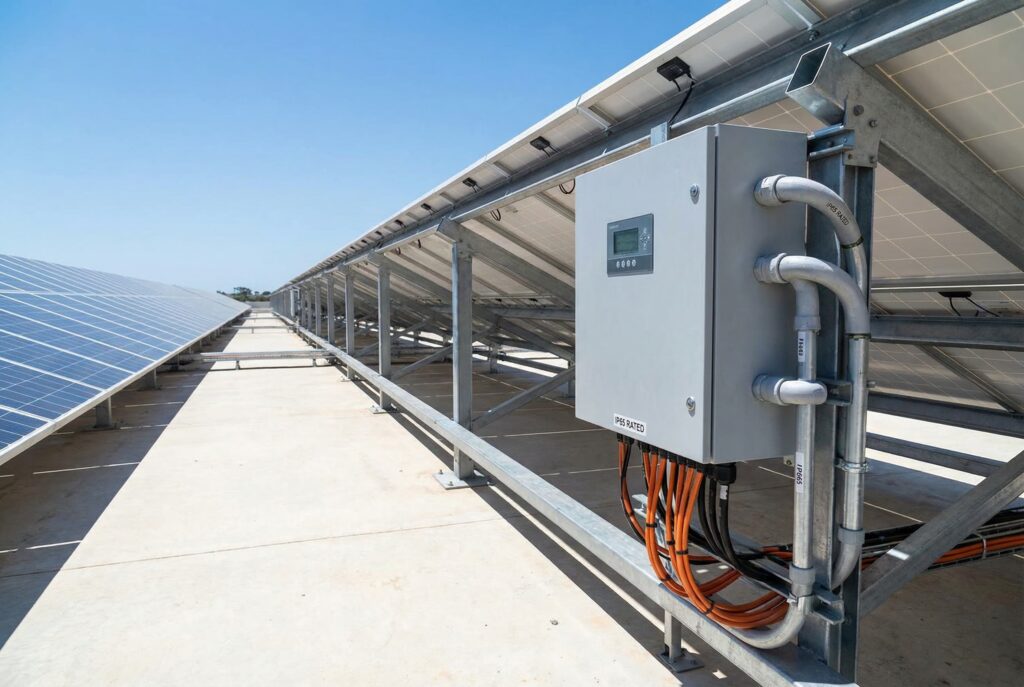
Солнечная батарея - это тонко настроенная система, в которой каждый компонент должен работать слаженно. Тем не менее, один из самых важных компонентов - объединительная коробка - часто понимается неправильно и не соответствует размерам. Несоответствующая объединительная коробка - это не просто точка неэффективности, это катастрофический сбой, который только и ждет, чтобы произойти. Перегрузка цепей, расплавление компонентов и даже пожар могут стать результатом неправильных номиналов напряжения и тока. Речь идет не только о соблюдении правил, но и о безопасности, долговечности и эффективности всех ваших инвестиций в солнечную энергию.
В этом руководстве дается исчерпывающее объяснение на инженерном уровне, как идеально подобрать объединительную коробку для фотоэлектрической системы к вашей солнечной батарее. Мы проведем необходимые расчеты напряжения и тока в соответствии с требованиями NEC, рассмотрим распространенные ошибки, которых следует избегать, и покажем, как выбор высококачественного компонента, такого как объединительная коробка CNKUANGYA, может обеспечить безопасную и надежную работу вашей системы в течение десятилетий.
Прежде чем определять размеры любого компонента, вы должны понять язык электрического “технического описания” самих солнечных модулей. Эти значения являются основой для всех расчетов, которые вы будете делать. Пытаться определить размеры объединительной коробки без них - все равно что пытаться ориентироваться без карты.
В качестве примера приведем типичную высокопроизводительную солнечную батарею:
Образец технического описания солнечной панели
Вот что означают эти критические параметры для проектирования системы:
Определив эти основополагающие параметры, мы можем перейти к первой половине уравнения определения размеров: согласованию напряжения.
Первый и самый важный шаг в соединительная коробка Выбор панели заключается в том, чтобы ее номинальное напряжение могло выдержать максимально возможное напряжение системы вашей солнечной батареи. Это определяется не стандартным Voc панели, а ее Voc с поправкой на максимально низкую температуру в месте установки. Почему? Потому что напряжение солнечной панели увеличивается с понижением температуры. Игнорирование этого факта может привести к напряжению, превышающему номиналы компонентов, что вызовет разрушение изоляции и создаст серьезную угрозу безопасности.
В Национальном электротехническом кодексе (NEC) этот вопрос рассматривается следующим образом Статья 690.7, В соответствии с которым напряжение системы должно быть рассчитано для самой низкой ожидаемой температуры окружающей среды.
Давайте разработаем строку для места с рекордно низкой температурой -10°C (14°F), используя наш образец панели мощностью 450 Вт (Voc = 49,8 В, темп. коэфф. = -0,25%/°C). Стандартные условия испытаний (STC) - 25°C.
Шаг 1: Найдите разницу температур
Рассчитайте разницу между STC и рекордно низкой температурой.
Шаг 2: Рассчитайте процент увеличения напряжения
Умножьте дельту температур на температурный коэффициент панели Voc.
Шаг 3: Рассчитайте Voc с поправкой на температуру (Voc_corrected)
Увеличьте стандартное значение Voc на рассчитанный процент. Это истинное максимальное напряжение, которое может выдать одна панель в самый холодный день.
Шаг 4: Определите максимальный размер строки
Разделите целевое напряжение системы (например, 1000 В для многих коммерческих систем) на скорректированное значение Voc на панель. Всегда округляйте в меньшую сторону до ближайшего целого числа.
Шаг 5: Рассчитайте конечное максимальное напряжение системы
Умножьте количество панелей в вашей сети на скорректированное значение Voc, чтобы найти наихудшее напряжение в сети.
Шаг 6: Выберите комбинированный блок
Выбирайте объединительную коробку с номинальным напряжением постоянного тока, превышающим расчетное максимальное напряжение системы.
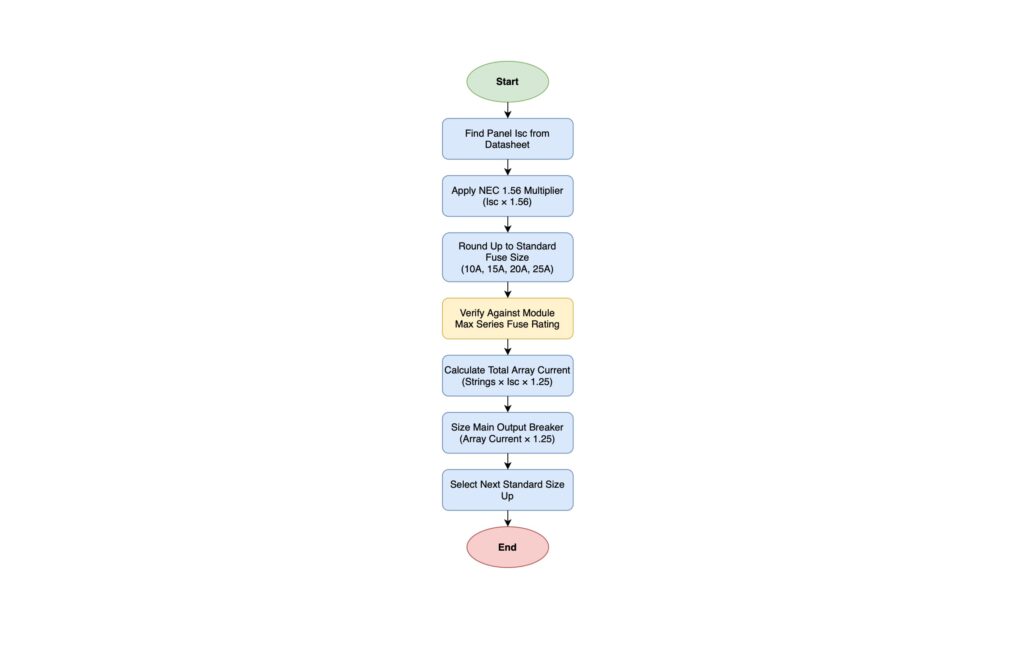
После того как напряжение определено, необходимо определить размеры устройств защиты от сверхтоков (УЗТС) и проводников. Это включает в себя два уровня: защиту каждой отдельной струны и защиту главного выхода, объединяющего все струны. Это регулируется NEC 690.8 (определение размеров цепи) и 690.9 (защита от сверхтоков).
Основной принцип заключается в том, чтобы учесть тот факт, что цепи солнечных батарей считаются “непрерывными” и могут испытывать повышенный ток из-за уровня солнечного излучения, превышающего стандарт STC 1000 Вт/м². Именно поэтому мы используем “двойной 125%” или множитель 1,56.
Каждая строка, входящая в комбинатор, должна быть защищена. Формула выглядит следующим образом:
Минимальный номинал предохранителя = Isc × 1,56
Пошаговый расчет струнного предохранителя
Используя нашу выборочную панель с Isc = 11.4A:
Шаг 1: Рассчитайте минимальный номинал предохранителя
Шаг 2: Выберите следующий стандартный размер предохранителя
Вы не можете купить предохранитель на 17,78 А. Вы должны округлить до следующего доступного стандартного размера предохранителя постоянного тока. Распространенными типоразмерами предохранителей постоянного тока являются 15A, 20A, 25A и 30A.
Этот расчет повторяется для каждой струны, подключенной к комбинированной коробке. Если ваш сумматор имеет 12 входов, вам потребуется 12 таких предохранителей на 20 А.
Главный выходной проводник и соответствующий ему разъединитель или выключатель должны быть рассчитаны на суммарный ток всех струн.
Пошаговый расчет основного выхода
Предположим, что мы проектируем систему с 8 струн.
Шаг 1: Рассчитайте общий максимальный ток массива
Этот расчет требует коэффициента безопасности 1,25 на сумму токов всех струн.
Шаг 2: Выберите номинал главного выключателя/разъединителя
Выходной выключатель или разъединитель с предохранителем должен иметь номинал не менее этого значения. Выберете следующий стандартный размер.
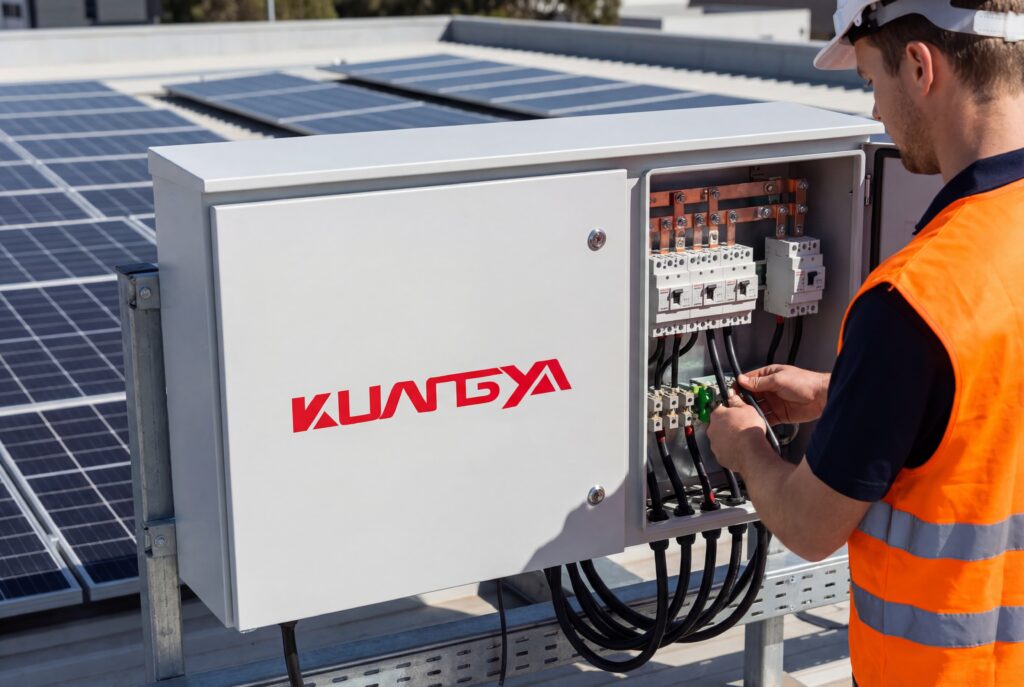
Качественные объединительные коробки от CNKUANGYA оснащены шинами соответствующего размера, чтобы выдерживать эти комбинированные токи без перегрева, обеспечивая безопасную и эффективную передачу энергии.
Чтобы упростить процесс проектирования, вот несколько таблиц для быстрого ознакомления, основанных на обсуждаемых принципах.
Таблица 1: Примеры расчета напряжения (целевая система 1000 В)
| Панель Voc (STC) | Панели на струну | Рекордно низкая температура. | Voc с поправкой на температуру (панель) | Максимальное напряжение системы | Требуемый номинал комбинированного фильтра |
|---|---|---|---|---|---|
| 49.8V | 18 | -10°C | 54.2V | 975.1V | 1000 В ПОСТОЯННОГО ТОКА |
| 48.5V | 19 | -5°C | 51.5V | 978.5V | 1000 В ПОСТОЯННОГО ТОКА |
| 41.2V | 22 | 0°C | 43.8V | 963.6V | 1000 В ПОСТОЯННОГО ТОКА |
Таблица 2: Примеры определения размеров струнных предохранителей
| Панель Isc | Мин. Номинал предохранителя (Isc x 1.56) | Выбранный стандартный предохранитель постоянного тока |
|---|---|---|
| 9.5A | 14.82A | 15A |
| 11.4A | 17.78A | 20A |
| 13.2A | 20.59A | 25A |
Таблица 3: Примеры определения размеров главного наконечника/прерывателя комбинатора
| Количество струн | Панель Isc | Общий максимальный ток ((Струны x Isc) x 1,25) | Выбранный главный выключатель |
|---|---|---|---|
| 4 | 11.4A | 57A | 60A или 70A |
| 8 | 11.4A | 114A | 125A |
| 12 | 11.4A | 171A | 175A или 200A |
Даже опытные профессионалы могут совершать ошибки. Вот пять распространенных ошибок, которые мы видим в полевых условиях, и почему они так опасны:
Isc x 1.56 коэффициент для непрерывной работы. Неразмерные провода будут перегреваться, создавая значительный риск возгорания.Пример 1: жилая крыша в суровом климате
Пример 2: Эффективность коммерческого наземного монтажа
“Для монтажника время - это деньги. Комбайны CNKUANGYA - это мечта для работы. Выступы чистые, есть много места для радиуса изгиба, а клеммы надежные. Я могу доверять качеству, и мои установки проходят быстрее. Это несомненный выбор”.”
- Джон П., ведущий монтажник, Apex Solar Solutions
“С инженерной точки зрения технические характеристики CNKUANGYA понятны, а их компоненты первоклассны. Я выбрал их комбинаторы на 1500 В со встроенными разъединителями для крупномасштабного проекта, и снижение затрат на баланс системы было значительным. Их продукция прочна, совместима и надежна”.”
- Мария Э., P.E., старший инженер-электрик, Sunstone Engineering Group
“Мы установили комбинированный блок CNKUANGYA в нашу наземную систему пять лет назад. Он безупречно работает и морозной зимой, и палящим летом. Знание того, что сердце нашей солнечной системы защищено таким надежным компонентом, дает нам невероятное спокойствие”.”
- Дэвид Л., владелец фермы
Используйте этот контрольный список при каждой работе, чтобы обеспечить безопасную, надежную и соответствующую нормам установку.
В солнечной фотоэлектрической системе нет места для “достаточно близко”. Правильно подобранный размер объединительной коробки для фотоэлектрической системы - это не дополнительная деталь, а основополагающий фактор безопасности, производительности и доходности вашего проекта. Усердно применяя формулы напряжения и тока в соответствии с требованиями NEC, вы защитите свои инвестиции от катастрофического отказа и обеспечите их работу с максимальной эффективностью.
Не позволяйте простому компоненту скомпрометировать сложную систему. Выбор надежного, предварительно спроектированного и сертифицированного объединительного блока от такого надежного производителя, как CNKUANGYA, упрощает этот важный шаг. Благодаря высококачественным материалам, продуманной конструкции и ряду решений для систем любого размера вы можете строить с уверенностью, зная, что ваш массив будет мощным и защищенным.
Готовы построить более безопасную и надежную солнечную батарею? Ознакомьтесь с нашим полным ассортиментом объединительных коробок для ПВ на 600, 1000 и 1500 В. или свяжитесь с нашей службой технической поддержки за помощью в разработке следующей системы.
